Wednesday, July 22, 2009
New mural for the guest room
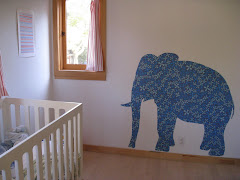
I do have an aversion to white walls. Perhaps to many apartments that I wasn't allowed to paint of hang up stuff, or maybe just an urge to mess up clean surfaces- who knows. This mural is in the same room as the star closet doors. I felt an overly themed-geometrical-pattern look would make people come back for another visit. Grandparents can never get enough circles, right? To make the pattern I measured and sketched out the circles using a tape measure for the lines, a level, and a circle that I cut out of manilla envelope. I played with the size of the circle for awhile trying to get the proportions with the wall right. I erred on the small side because I knew I could always make the circles bigger- but in the end stuck with the small size. I drew everything with a pencil and had to erase a line. I found windex got pencil off splendidly. Everything was painted free hand with interior paint. Come on over and stay a night!
New curtains for problem windows
*Pictures coming tonight*
Curtains aren't usually on your mind when you are remodeling a house, moving rooms, taking out walls, and so forth. But they should be. In our bedroom we have two giant windows that are placed in the very corners of the room- that's where they were when we moved in. In my opinion, dumb planning because it is a very long room and the wall had ample space to put windows in normal places, like a foot or two away from the perpendicular wall. Anyway, that's what we had to work with, but what I didn't realize is that curtain rods won't fit on such windows.
Now that people have moved in next-door and the people behind us built an extra floor or two on their house, our bedroom windows are more of a display case these days. I finally gave in to societal norms and went on a quest for curtains. There are wire "rods" available these days that take up very little room and would fit the space. However, we had already used that method in two other rooms, plus the wires begin to sag after awhile which is annoying. I came up with a very cheap system, compliments of the hardware store. Six washers and some giant tacks. Then I went to the fabric store and bought some white material to make my patented curtain square i.e. just hem four sides of a square. I measured two squares per window (rectangles if you want to get technical) and then hand sewed the washers onto the top of the curtain. The washers then hung on the tacks that I nailed into the top of the molding. When I want the curtains open I can bundle the washes onto the corner tacks, or I can role the curtains- the look is a bit reminiscent of Hasidic sideburns, but very compact. When I want the curtains closed, I just hang each washer on its individual tack.
Cheap and effective. I may try to spruce them up a bit, perhaps two washers per “loop” making the curtains dangle a bit more. But for now, the neighbors will no longer be blinded by my frighteningly white belly after a shower!
Thursday, July 9, 2009
Anybody need some squash?
So at the top of our giant hill is a small flat spot. This summer I decided to turn it into a garden, or at least try to. My gardening skills are based on walking by other people's gardens and trying to guess what they have done- not very professional. I have done some reading too, but not too sure I gleaned anything from that method. These are my steps for making your own garden:
1. find a spot that gets lots of sun and that you can water
2. turn the soil- this means pulling up all the stuff that grows there, and then, with a shovel, literally scoop up the dirt and turn it over. The weed-pulling is a sizable bit of work, but it does give a nice sense of accomplishment when all those useless weeds are conquered. At this moment I like to imagine the lush green, ridiculously productive garden that will be there in just a few short weeks. Then I pick up my shovel and start turning and cursing, regretting my plan for a 20' x 5' plot instead of a 2' x 3' plot. You can add a bit of supplement to your dirt at this point if you want- something in the powder form that you get at a garden place- but add sparingly, you can actually poison the soil by putting down too much. If you don't have supplement, don't worry about. The turning process aerates the soil and gets it ready for seeds or seedlings
3. mound the soil into a few rows- visualize a cartoon field with mounds, that is exactly what you are shooting for.
4. Plant your seeds! I buy seeds at the fancy garden store, at home depot, at the 99 cent store-- basically everywhere. Some grow, some don't and it doesn't matter where they came from. I follow the directions on the package for seed depth, but that's about it. I plant a gazillion seeds in a small space and figure I can thin them out later. You can plant seedlings in your rows, but give them space to get big because they probably won't die. For tomato seedlings always put a tomato cage around the seedling about the time you plant it- that way you won't harm any root systems.
5. Put the empty seed packets over little sticks at the end of each row- this way you remember what's planted where, and it makes the naked dirt look a bit cuter.
6. At this point I laid a soaker hose down my rows, and watered for about 10 minutes. If you're using a wateringcan, then just give the new seeds a good dose and cross you fingers.
7. In LA I water about 2-3 times a week, trying to do it in the early morning.
8. Sit back and watch your garden grow! Remove weeds- which is easier said than done because I often don't know what my seedlings will look like, therefor I error on the side of caution.
9. Figure out that something is eating all your seedlings and ask significant other to build a fence.
10. Harvest yummy veggies, and then two days later realize you're sick of squash and need to find a home for the twenty more pounds that are coming your way!
Friday, July 3, 2009
Starring brand new closet doors!
I made these with the help of my husband and a friendly guy at home depot. We needed new closet doors for the guest bedroom because there where none when we moved in. Looking at closet doors was depressing, everything screamed cheap apartment. There were some expensive frosted glass ones that seemed ok, but not worth their price. So, while standing in the aisle at home depot trying to decide what to do and listening to my husband attempt to wrangle our children three aisles over, I asked for help. The employee walking by explained that these were all of the pre-made options, could I not find what I wanted? When I gave him a defeated shrug of the shoulders, and mumbbled "but they're all so boring" he suggested that maybe I could make my own. He had made closet doors himself, all you needed was two flat pieces of plywood and a door hanging set which could be found on aisle 14. I grabbed my husband and children, and hit the big wood aisle. We also got the big rollie cart for the wood, much to the delight of our kids. We picked out two of the flattest pieces we could find and then had them cut the wood there. If you do this project, make sure you have the wood cut like an inch and half or two smaller than the opening because the hanging kit and runners take up some space. Don't forget to grab two handles for the doors when you're there!
I laid the wood out in the garage and painted it grey, two coats. Then I had painted the stars- they are by no means symmetric or even, but that was the look I wanted. Christian did the hanging part and poof, now we have closet doors!
Ok, not exactly poof, when we went to hang them, our doors were too tall- I hadn't subtracted the 2 inches. When then made a fieldtrip to a friend's house and cut off the extra using their table saw. Pain in the ass, but then, poof- we had closet doors!
Headboard
This headboard debuted on design*sponge earlier this week- very exciting stuff! If you haven't checked-out the site, you should, like right now. Beautiful images to inspire and clever ideas that can lead to amazing afternoon craft projects. I give step by step directions on how to make the headboard on the site, just look up headboard in the search field, or look under the DIY section. Basically it is a free hand drawing inspired by argyle sweaters and mountain scenes circa 4th grade drawing class. I used regular interior wall paint and that is about it. Definitely try this one at home!
http://www.designspongeonline.com/
http://www.designspongeonline.com/
Subscribe to:
Comments (Atom)


