Wednesday, July 22, 2009
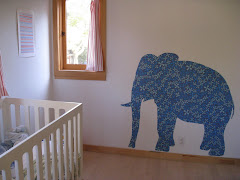
New mural for the guest room
I do have an aversion to white walls. Perhaps to many apartments that I wasn't allowed to paint of hang up stuff, or maybe just an urge to mess up clean surfaces- who knows. This mural is in the same room as the star closet doors. I felt an overly themed-geometrical-pattern look would make people come back for another visit. Grandparents can never get enough circles, right? To make the pattern I measured and sketched out the circles using a tape measure for the lines, a level, and a circle that I cut out of manilla envelope. I played with the size of the circle for awhile trying to get the proportions with the wall right. I erred on the small side because I knew I could always make the circles bigger- but in the end stuck with the small size. I drew everything with a pencil and had to erase a line. I found windex got pencil off splendidly. Everything was painted free hand with interior paint. Come on over and stay a night!
New curtains for problem windows
*Pictures coming tonight*
Curtains aren't usually on your mind when you are remodeling a house, moving rooms, taking out walls, and so forth. But they should be. In our bedroom we have two giant windows that are placed in the very corners of the room- that's where they were when we moved in. In my opinion, dumb planning because it is a very long room and the wall had ample space to put windows in normal places, like a foot or two away from the perpendicular wall. Anyway, that's what we had to work with, but what I didn't realize is that curtain rods won't fit on such windows.
Now that people have moved in next-door and the people behind us built an extra floor or two on their house, our bedroom windows are more of a display case these days. I finally gave in to societal norms and went on a quest for curtains. There are wire "rods" available these days that take up very little room and would fit the space. However, we had already used that method in two other rooms, plus the wires begin to sag after awhile which is annoying. I came up with a very cheap system, compliments of the hardware store. Six washers and some giant tacks. Then I went to the fabric store and bought some white material to make my patented curtain square i.e. just hem four sides of a square. I measured two squares per window (rectangles if you want to get technical) and then hand sewed the washers onto the top of the curtain. The washers then hung on the tacks that I nailed into the top of the molding. When I want the curtains open I can bundle the washes onto the corner tacks, or I can role the curtains- the look is a bit reminiscent of Hasidic sideburns, but very compact. When I want the curtains closed, I just hang each washer on its individual tack.
Cheap and effective. I may try to spruce them up a bit, perhaps two washers per “loop” making the curtains dangle a bit more. But for now, the neighbors will no longer be blinded by my frighteningly white belly after a shower!
Thursday, July 9, 2009
Anybody need some squash?
So at the top of our giant hill is a small flat spot. This summer I decided to turn it into a garden, or at least try to. My gardening skills are based on walking by other people's gardens and trying to guess what they have done- not very professional. I have done some reading too, but not too sure I gleaned anything from that method. These are my steps for making your own garden:
1. find a spot that gets lots of sun and that you can water
2. turn the soil- this means pulling up all the stuff that grows there, and then, with a shovel, literally scoop up the dirt and turn it over. The weed-pulling is a sizable bit of work, but it does give a nice sense of accomplishment when all those useless weeds are conquered. At this moment I like to imagine the lush green, ridiculously productive garden that will be there in just a few short weeks. Then I pick up my shovel and start turning and cursing, regretting my plan for a 20' x 5' plot instead of a 2' x 3' plot. You can add a bit of supplement to your dirt at this point if you want- something in the powder form that you get at a garden place- but add sparingly, you can actually poison the soil by putting down too much. If you don't have supplement, don't worry about. The turning process aerates the soil and gets it ready for seeds or seedlings
3. mound the soil into a few rows- visualize a cartoon field with mounds, that is exactly what you are shooting for.
4. Plant your seeds! I buy seeds at the fancy garden store, at home depot, at the 99 cent store-- basically everywhere. Some grow, some don't and it doesn't matter where they came from. I follow the directions on the package for seed depth, but that's about it. I plant a gazillion seeds in a small space and figure I can thin them out later. You can plant seedlings in your rows, but give them space to get big because they probably won't die. For tomato seedlings always put a tomato cage around the seedling about the time you plant it- that way you won't harm any root systems.
5. Put the empty seed packets over little sticks at the end of each row- this way you remember what's planted where, and it makes the naked dirt look a bit cuter.
6. At this point I laid a soaker hose down my rows, and watered for about 10 minutes. If you're using a wateringcan, then just give the new seeds a good dose and cross you fingers.
7. In LA I water about 2-3 times a week, trying to do it in the early morning.
8. Sit back and watch your garden grow! Remove weeds- which is easier said than done because I often don't know what my seedlings will look like, therefor I error on the side of caution.
9. Figure out that something is eating all your seedlings and ask significant other to build a fence.
10. Harvest yummy veggies, and then two days later realize you're sick of squash and need to find a home for the twenty more pounds that are coming your way!
Friday, July 3, 2009
Starring brand new closet doors!
I made these with the help of my husband and a friendly guy at home depot. We needed new closet doors for the guest bedroom because there where none when we moved in. Looking at closet doors was depressing, everything screamed cheap apartment. There were some expensive frosted glass ones that seemed ok, but not worth their price. So, while standing in the aisle at home depot trying to decide what to do and listening to my husband attempt to wrangle our children three aisles over, I asked for help. The employee walking by explained that these were all of the pre-made options, could I not find what I wanted? When I gave him a defeated shrug of the shoulders, and mumbbled "but they're all so boring" he suggested that maybe I could make my own. He had made closet doors himself, all you needed was two flat pieces of plywood and a door hanging set which could be found on aisle 14. I grabbed my husband and children, and hit the big wood aisle. We also got the big rollie cart for the wood, much to the delight of our kids. We picked out two of the flattest pieces we could find and then had them cut the wood there. If you do this project, make sure you have the wood cut like an inch and half or two smaller than the opening because the hanging kit and runners take up some space. Don't forget to grab two handles for the doors when you're there!
I laid the wood out in the garage and painted it grey, two coats. Then I had painted the stars- they are by no means symmetric or even, but that was the look I wanted. Christian did the hanging part and poof, now we have closet doors!
Ok, not exactly poof, when we went to hang them, our doors were too tall- I hadn't subtracted the 2 inches. When then made a fieldtrip to a friend's house and cut off the extra using their table saw. Pain in the ass, but then, poof- we had closet doors!
Headboard
This headboard debuted on design*sponge earlier this week- very exciting stuff! If you haven't checked-out the site, you should, like right now. Beautiful images to inspire and clever ideas that can lead to amazing afternoon craft projects. I give step by step directions on how to make the headboard on the site, just look up headboard in the search field, or look under the DIY section. Basically it is a free hand drawing inspired by argyle sweaters and mountain scenes circa 4th grade drawing class. I used regular interior wall paint and that is about it. Definitely try this one at home!
http://www.designspongeonline.com/
http://www.designspongeonline.com/
Friday, June 26, 2009
Growing up the wall
Our latest big project is to get some greenery on the giant blank wall that dominates the front of our house. Luckily we have befriended a couple of very talented architects that have landscaping ideas and knowledge gallore. The basic steps are 1) figuring out what can grow in the area, which means taking into account the position of the sun, the amount of light that hits the roots and the leaves, and what type of weather you have. 2) what will your vine need to grow on to be happy? Some vines like creeping fig simply stick to the wall, but most other vines need a trellis system.
I selected a variety of honeysuckle because, most importantly, I think its pretty and it smells nice. It also is suppose to grow like a bat outta hell and be almost impossible to kill. It's also evergreen, and not terribly heavy. It needs moderate light and moderate water, both of which I could offer a new vine.
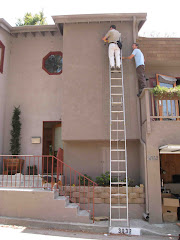
Picking out pretty green things is always an easy task. The trellis, not so easy. Colin, the brains behind this project, suggested chain link fence attached to the wall. It could be painted to match the house and would be cheap. His tastes run more industrial than mine and I compromised with a plastic coated upscale chicken wire type fencing- home depot 50' for $50. Getting the fencing attached to a wall that reached 28 or so feet up in the air proved a bit tough. We (and by we I mean my husband and Colin) used a drill with a masonry bit to get through the stucco. The screw into the wall needed to have about 1/2 inch space between the head and the wall. This is because the trellis needed to be about a half inch off the wall enabling the plant's tendrils to weave in and out. Adding a stand-off to the screw, basically a little metal straw, served this purpose perfectly. I'll post some pictures and if you have any questions about the drill, drill bit, or standoff just let me know.
The last piece of luck came from our neighbors who happened to have their house painted at this time. The painters let us borrow their 24 foot ladder and we got the trellis up in about an hour and a half. Now, I just hope I don't manage to kill the honey suckle . . .
I selected a variety of honeysuckle because, most importantly, I think its pretty and it smells nice. It also is suppose to grow like a bat outta hell and be almost impossible to kill. It's also evergreen, and not terribly heavy. It needs moderate light and moderate water, both of which I could offer a new vine.
Picking out pretty green things is always an easy task. The trellis, not so easy. Colin, the brains behind this project, suggested chain link fence attached to the wall. It could be painted to match the house and would be cheap. His tastes run more industrial than mine and I compromised with a plastic coated upscale chicken wire type fencing- home depot 50' for $50. Getting the fencing attached to a wall that reached 28 or so feet up in the air proved a bit tough. We (and by we I mean my husband and Colin) used a drill with a masonry bit to get through the stucco. The screw into the wall needed to have about 1/2 inch space between the head and the wall. This is because the trellis needed to be about a half inch off the wall enabling the plant's tendrils to weave in and out. Adding a stand-off to the screw, basically a little metal straw, served this purpose perfectly. I'll post some pictures and if you have any questions about the drill, drill bit, or standoff just let me know.
The last piece of luck came from our neighbors who happened to have their house painted at this time. The painters let us borrow their 24 foot ladder and we got the trellis up in about an hour and a half. Now, I just hope I don't manage to kill the honey suckle . . .
Tuesday, January 27, 2009
Wednesday, January 14, 2009
We bought a very ugly house in a very nice neighborhood because it was significantly cheaper and had many of the requirements we were looking for. The house was located in the Ivanhoe school district, only had a few steps to the front door, a yard that we could enclose for our dog, and an adequate flat yard space for our kids. When we bought the house in 2007, the economy and housing market were still crazy high- we paid $865,000 for our ugly duckling. At 2,175 sq ft, three bathrooms, and five bedrooms the place was huge compared to the other homes we were considering, but even with so many square feet and bathrooms, the place sat on the market for a year and half empty. Apparently at one point there was a sign on the front that said "Buy this house and get a free car!" A group of contractors purchased the place in 2005 for $825,000, did a pathetic remodel (one of the new bathroom doors hit the toilet when you tried to enter the bathroom) and then attempted to flip it, asking $1.1 million initially.
After getting a couple quotes, we picked a contractor- our relator's husband. We weren't sucker's I swear! He was genuinely the best quote. He and his wife purchased, remodelled and then sold several houses themselves. They both offered tons of input and help conceptually. I didn't use an architect. We moved into our house 5 months after we bought it. For the first three months of the remodel I was immensely pregnant, and then our second child was born. I learned most people in the building industry are extremely helpful to very pregnant women! I also learned picking subcontractors myself was a huge mistake, see window section. Other than giving birth and taking caring of kids, I spent the five months thinking, watching, and making decisions about the house. The best decision I made was hiring Geoff as the contractor! And picking out the bath tub . .
The big ticket item for our remodel was new wood casement windows for the whole house, new interior doors, a new french door for the balcony, and a new folding door system for the dining room. The exterior doors and windows came from Taylor Brothers, a great establishment, and the interior doors came from ETO, another great place to work with. I chose Dr. Door to install the windows and exterior doors, with that idea that Geoff could be freed up to work on the rest of the house. Turns out Dr. Door, a supposedly professional window and door installer, SUCKED. Awful on every level imaginable. Geoff ended up spending a giant chunk of time just watching the installation, and then informing that they need to do it over the correct way, again and again. I would have been so screwed if Geoff had not made these jerks do what I was paying them a ridiculous amount of money to do. In hindsight, I should have just deferred everything to Geoff and it would have been done faster, cheaper and better. Much better.
The whole remodel cast around $135,000.
PLease feel free to post any questions about price, vendor locations, and so forth! I am happy to help in anyway I can.
backyard
The original doors out to the back were sliding glass doors, and only a three foot opening lead outside. There was a small set of three concrete steps one the left side. The right side of the doors look directly at two giant air compressors for the air conditioning units. It was the stupidest, ugliest location I could imagine. No matter how nice the back yard was, your eye would always be drawn to these hideous contraptions.
With the new doors, Geoff built a 12 foot little deck and step. The deck part is about 30 inches wide and there are two steps. The air conditioning compressors were moved to the left of the step and you cannot see them from the dining area anymore.
We picked up the flag stones from the large center portion of the back and used them to make a dining area on the right side of the yard. We placed recycled plastic mats on the center part. We chose plastic mats over dirt so that the kids would have a softish surface to fall on. The left side of the yard has an orange tree. Under the tree we made a wood pallet and put a water table on top. The back slope is not irrigated at this time, so we sit back and watch the war between ivy, morning glories and grass. One day I'll try to tame the beast, but right now I'm just happy if the slope is green.
Dining room/ kitchen
Originally the first floor had a large room with a doorway at one end that lead to a galley kitchen. It seemed like the person responsible for picking the kitchen floor plan hated kitchens and punished it by providing a miniscule amount of floor space in a far dark corner of a huge room. We removed everything from the old kitchen- Craig's list is excellent for finding people who can use items you don't want. Then we took out the wall and let the kitchen flow about 16 feet into the dining room. We also made a new laundry room and pantry off to the side.
The cabinets came from home depot and were $7,000. The counter is Corian, the stove our center piece. We got it on sale for 50 percent off, a steal at $4,000- I'm joking, we had no intent of buying such a fancy stove, but somehow it sang to us from across the store and we simply fell in love.
The back splash behind the stove is moroccan and the tiles were about $500. The white subway tile is from Dal and cost maybe $100.
Geoff installed all the cabinets and appliances, built the pantry/laundry room, and oversaw the installation of the counter top and doors.
The other major change we made to this room was installing a four panel door system that opens all the way. The door itself cost around $7,000. When it is warm enough to open the door all the way, about 11 months out of the year here, the backyard and kitchen seem like one.
Entryway
This area had the worst flow I have ever experienced in a house. I don't have a picture, but the front door opened up to have you face a wall that ended in a black pit of open space under the stairwell. We picked out a new glass front door, switching the "hand"- new handle on the left side instead of the right side. Geoff built a door and wall making a small, pleasant entry closet instead of a dark pit to the side on the right.
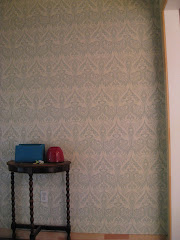
From the front door into the dining room was a small opening that just felt dumpy. We opened the archway and, with the new glass door, light now pours into the dining room. We also wallpapered one wall of the entry way to accent the nine foot ceiling and have a little fun. All of the hardware for the doors and windows is Emtek- order on line for best prices.
From the front door into the dining room was a small opening that just felt dumpy. We opened the archway and, with the new glass door, light now pours into the dining room. We also wallpapered one wall of the entry way to accent the nine foot ceiling and have a little fun. All of the hardware for the doors and windows is Emtek- order on line for best prices.
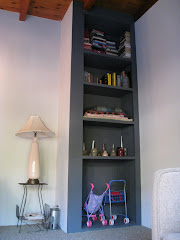
Living room
Here we significantly changed the feel of the room by re-opening the balcony and replacing the stairwell with a book case. The new carpet helped a lot as well. We also added wiring for two sconces above the couch. Instead of a TV, we use a projector to watch movies on the large wall by the bookcase.
Stairwell
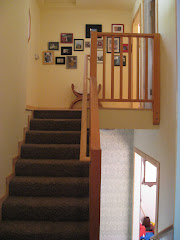
Even though the before picture looks ok, the carpet was the cheapest, crappiest industrial carpet available and the railing simply was not my taste. I wanted to have carpeted stairs because I know the little ones are bound to make it a high traffic play area. The carpet is Dupont, and Geoff did the new railings, and under stair area.
Chandelier
The new hallway conformation on the second floor created a great place for a chandelier. I found a beautiful glass on on-line for $300, and it arrived in about 300 pieces! My husband and I spent maybe three hours putting it together and wiring all the lights. Geoff was kind enough to come over and double check our wiring job for us- it helped that he lives in our neighborhood.
Front second floor bedroom
This room of the house became smaller when we changed the location of a bathroom, but it is still a nice sized bedroom with a loft now. We will add a ladder and safety railing to the loft when the kids get a little bigger- right now I am glad it's inaccessible. In the pictures of the front room and bath you can see the new floors being installed. We choose Maple and then made it whiter by "pickling" it. Not a common process and the floor guys had a to do the whole thing twice. It still isn't a great job with some streaking and such, but a few strategically placed carpets and all is good. Overall I thought the floor guys did a mediocre job on the house.
Master Bedroom
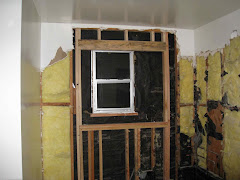
We added a small window to fill a large space between the two already existing windows. Geoff framed it out and did the finish work. He and Karen were also responsible for suggesting the final floor plan. The original master bedroom had no closet. The bedroom shared a wall with the third bathroom, a poorly located bathroom that had an entry door hitting the toilet. They suggested I commander the old bathroom's foot print for a spacious master closet. The front bedroom on the second floor originally had a kitchenette and therefor a "wet wall" i.e. plumbing. The kitchenette area became a new bathroom with a loft above. Geoff moved the bathroom for around $5,000 and saved our marriage by insisting that we have a master closet.
The new closet has wall paper I found on the Graham and Brown website- an excellent resource. The wallpaper hanger was a mercenary. After giving a quote, showing up late, he would say "Oh, you don't have enough paper, but if you pay me another $80, I can make it work." Creepy guy.
The new closet has wall paper I found on the Graham and Brown website- an excellent resource. The wallpaper hanger was a mercenary. After giving a quote, showing up late, he would say "Oh, you don't have enough paper, but if you pay me another $80, I can make it work." Creepy guy.
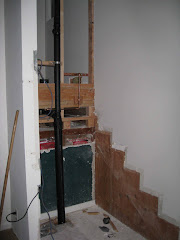
Master Bathroom
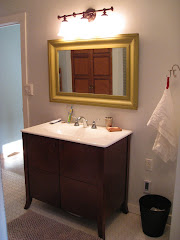
The original bathroom could be entered via the stairway from the living room or through the master bedroom. We changed the landing form the stairway into a W.C., removed the scary built in jacuzzi tub circa 1983, the stand up shower stall that was located near the tiny window, and the double sink. Because there was ample space between the kitchen ceiling below and the bathroom floor, moving plumbing around wasn't a big deal. I replaced the jacuzzi with a free standing acrylic tub ($1800), and designed a tiled shower stall using extremely cheap porcelain Dal tiles. The blue tiles behind the tub are hand made and that lot cost about $1000. The sink and sink base are from Kohler and cost $1000- I was surprised by how much sinks ans sink bases went for. The floor tile is also Dal and very cheap. The toilet is made by Toto and around $200. Geoff reframed the big window and installed the vanity. He also built the shower wall and the W.C. And I'm sure he did lots of other stuff I can't remember right now. He subcontracted the plumbing, the tiles, and the electric. The plumbing may not be the best, but the tile and electric guys seemed on top of their game.
Monday, January 12, 2009
the front balcony
The original house was built in the 1940's as a typical bungalow- two bedroom one bath. The guy who built it chose a shady shop at the bottom of a hill. The front of the house overlooks an intersection. In 1970 the same person who built the house added a room above the garage which boosted a 12 ft wood and beam ceiling and a balcony overlooking the street. In 1996 a later owner built another addition on three bedrooms and a bathroom on top of the original house. I imagine the family responsible for the 1996 remodel consisted of three factions that hated each other and the rest of the world. The flow of the house was more reminescent of a vaguely run down apartment building with three apartments, than a single family home. They closed in the balcony giving the whole house a prison like effect.
I have also learned that if you buy an ugly house that was formerly inhabited by people who fought with their neighbors, you become instantly popular simply by acting normal. I love it when the bar is low.
I have also learned that if you buy an ugly house that was formerly inhabited by people who fought with their neighbors, you become instantly popular simply by acting normal. I love it when the bar is low.
In a nutshell
We bought a very ugly house in a very nice neighborhood because it was significantly cheaper and had many of the requirements we were looking for. The house was located in the Ivanhoe school district, only had a few steps to the front door, a yard that we could enclose for our dog, and an adequate flat yard space for our kids. When we bought the house in 2007, the economy and housing market were still crazy high- we paid $865,000 for our ugly duckling. At 2,175 sq ft, three bathrooms, and five bedrooms the place was huge compared to the other homes we were considering, but even with so many square feet and bathrooms, the place sat on the market for a year and half empty. Apparently at one point there was a sign on the front that said "Buy this house and get a free car!" A group of contractors purchased the place in 2005 for $825,000, did a pathetic remodel (one of the new bathroom doors hit the toilet when you tried to enter the bathroom) and then attempted to flip it, asking $1.1 million initially.
After getting a couple quotes, we picked a contractor- our relator's husband. We weren't sucker's I swear! He was genuinely the best quote. He and his wife purchased, remodelled and then sold several houses themselves. They both offered tons of input and help conceptually. I didn't use an architect. We moved into our house 5 months after we bought it. For the first three months of the remodel I was immensely pregnant, and then our second child was born. I learned most people in the building industry are extremely helpful to very pregnant women! I also learned picking subcontractors myself was a huge mistake, see window section. Other than giving birth and taking caring of kids, I spent the five months thinking, watching, and making decisions about the house. The best decision I made was hiring Geoff as the contractor! And picking out the bath tub . .
After getting a couple quotes, we picked a contractor- our relator's husband. We weren't sucker's I swear! He was genuinely the best quote. He and his wife purchased, remodelled and then sold several houses themselves. They both offered tons of input and help conceptually. I didn't use an architect. We moved into our house 5 months after we bought it. For the first three months of the remodel I was immensely pregnant, and then our second child was born. I learned most people in the building industry are extremely helpful to very pregnant women! I also learned picking subcontractors myself was a huge mistake, see window section. Other than giving birth and taking caring of kids, I spent the five months thinking, watching, and making decisions about the house. The best decision I made was hiring Geoff as the contractor! And picking out the bath tub . .
Subscribe to:
Posts (Atom)